

Last Updated on May 23, 2025 by Mama Nova
1. Speedy Shrimp Tacos with Dreamy Avocado Crema 🌮
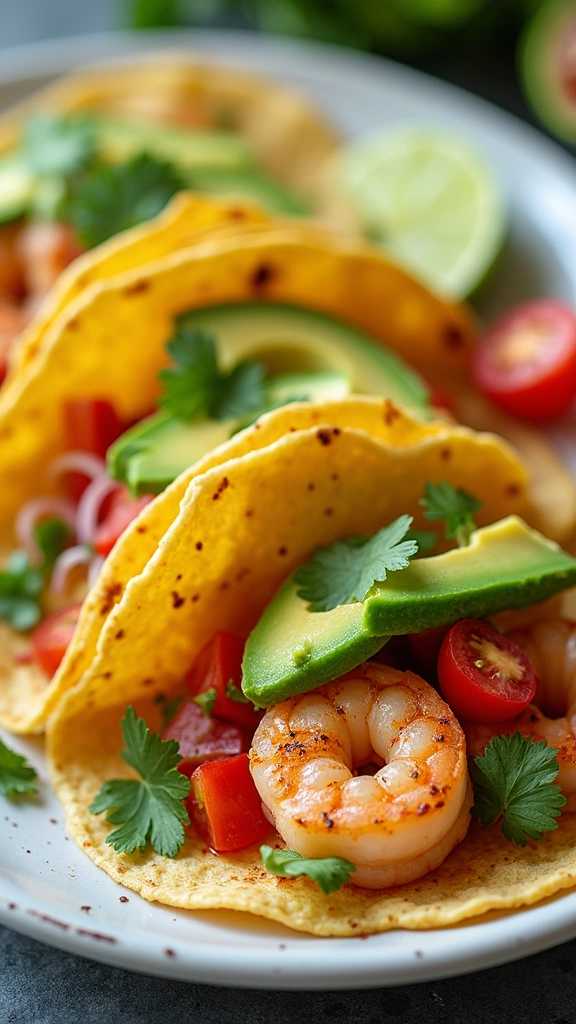
Taco night just got a 15-minute glow-up! These zesty shrimp tacos are a flavor explosion, and that creamy avocado drizzle? Chef’s kiss. Perfect for when you’re racing against the clock but still want a meal that feels special. (P.S. Your secret weapon? A trusty non-stick skillet—no stuck shrimp here!)
– Servings: 4
– Prep Time: 5 mins
– Cook Time: 10 mins
– Total Time: 15 mins
– Calories: 300/serving (Protein-packed & full of good fats!)
Ingredients:


- 1 lb shrimp, peeled & deveined (fresh or thawed)
- 1 tsp chili powder + 1 tsp cumin (dynamic spice duo!)
- Salt & pepper to taste
- 8 small corn tortillas (or swap for flour if preferred)
- 1 avocado (hello, creamy magic!)
- ½ cup Greek yogurt (or sour cream for tang)
- 1 tbsp lime juice (brightens everything up!)
- Toppings bar: Chopped cilantro, diced tomatoes, shredded cabbage—go wild!
Instructions:
- Spice your shrimp: Toss them with chili powder, cumin, salt, and pepper like you’re seasoning a superstar. 🌟
- Sizzle time: Cook shrimp in a non-stick skillet over medium heat for 2-3 mins per side (they’re done when pink and happy).
- Crema dream: Blend avocado, Greek yogurt, lime juice, and a pinch of salt until silky smooth. (An avocado slicer makes this step stupid easy.)
- Warm your tortillas: 30 seconds in a dry skillet or microwave—steamy = extra yummy.
- Build your masterpiece: Load tortillas with shrimp, drizzle with crema, and pile on toppings. (Pro tip: A taco stand keeps them upright and Instagram-ready!)
Leftover Hack:
Extra shrimp? Toss them into a next-day salad for a no-effort lunch win. 🥗
FAQs:
- Frozen shrimp okay? Yes! Just thaw in cold water first.
- No Greek yogurt? Sour cream or coconut yogurt work too.
- Why avocado? It’s a nutrient superhero—packed with healthy fats and fiber to keep kiddos (and you!) fueled.
Why Mums Adore This:
It’s fast, fresh, and feels like a fiesta—without the fuss. Even picky eaters gobble these up!
Game-Changer Tools:
- Non-stick skillet (for shrimp that slides right off)
- Avocado slicer (no more wrestling with pits)
- Taco holder stand (because nobody likes a flopped taco)
2. Sweet Potato & Black Bean Freezer Burritos 🌯
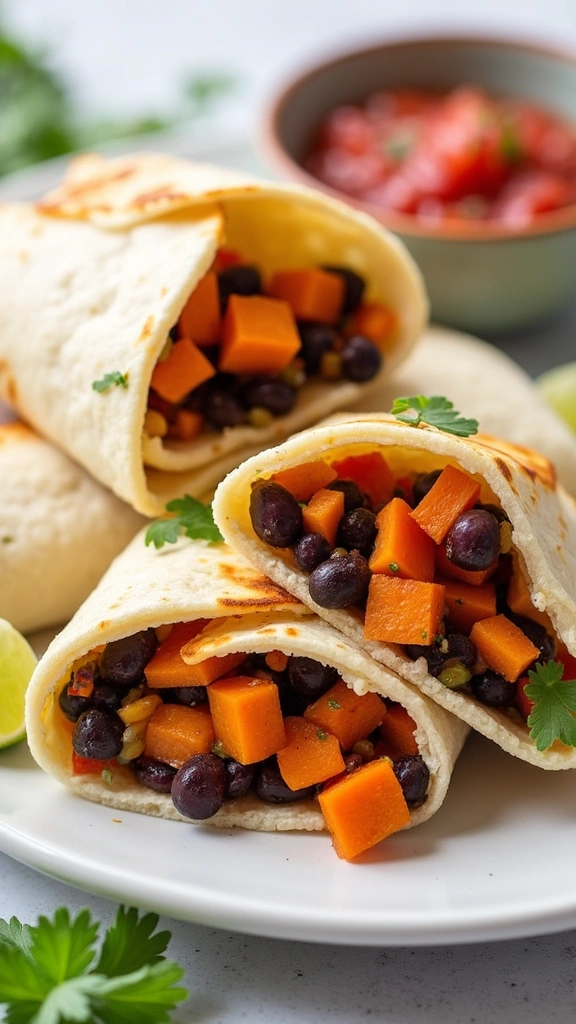
Meal prep magic alert! These hearty, veggie-packed burritos are a nutrient powerhouse—sweet potatoes for vitamins, black beans for protein, and all the cozy flavors your family craves. Make a big batch, freeze ’em, and kiss “What’s for dinner?” stress goodbye. (P.S. A silicone baking mat = zero stuck-on cheese. You’re welcome.)
– Servings: 6
– Prep Time: 15 mins
– Cook Time: 30 mins
– Total Time: 45 mins
– Calories: 400/serving (Fiber-rich & protein-packed!)
Ingredients:
- 2 large sweet potatoes, peeled + cubed (nature’s candy!)
- 1 can black beans, drained/rinsed (plant-based protein MVP)
- 1 cup cooked rice (brown or white—your call!)
- 1 tsp cumin + 1 tsp chili powder (the flavor dream team)
- 6 large tortillas (whole wheat or gluten-free if needed)
- 1 cup shredded cheese (optional but oh-so-gooey)
- Salsa for dunking (because burritos need a sidekick)
Instructions:
- Heat things up: Preheat oven to 400°F (200°C).
- Roast those taters: Toss sweet potato cubes with olive oil, cumin, and chili powder. Bake for 25 mins until fork-tender. (Pro tip: Use that silicone mat for easy cleanup!)
- Mix & mingle: In a bowl, combine roasted sweet potatoes, black beans, rice, and cheese. (Add cooked ground turkey or beef here if you’re feeling meaty.)
- Wrap it up: Spoon filling onto tortillas, roll ’em tight, and tuck into a baking dish.
- Crispy finish: Bake for 10 more mins until golden. Serve with salsa!
Meal Prep Hack:
Double the batch! Wrap extras in reusable food storage bags or meal prep containers and freeze. Future-you will high-five present-you. ✋
FAQs:
- Meat-lover option? Add ground turkey or beef—just brown it first!
- Reheating frozen burritos? Microwave for 2-3 mins or bake at 350°F until warm.
- Why sweet potatoes? They’re loaded with vitamin A, fiber, and kid-friendly sweetness—sneaky nutrition win!
Why Mums Go Gaga:
✅ One prep = multiple meals (freezer gold!)
✅ Packed with hidden veggies (shhh…)
✅ Even picky eaters devour them (the ultimate compliment)
Kitchen Heroes:
- Meal prep containers (stackable, BPA-free, sanity-saving)
- Silicone baking mat (no-scrub cleanup)
- Reusable food storage bags (planet- + budget-friendly)
3. Creamy Dreamy Mushroom Pasta (Ready in 25 Minutes!)
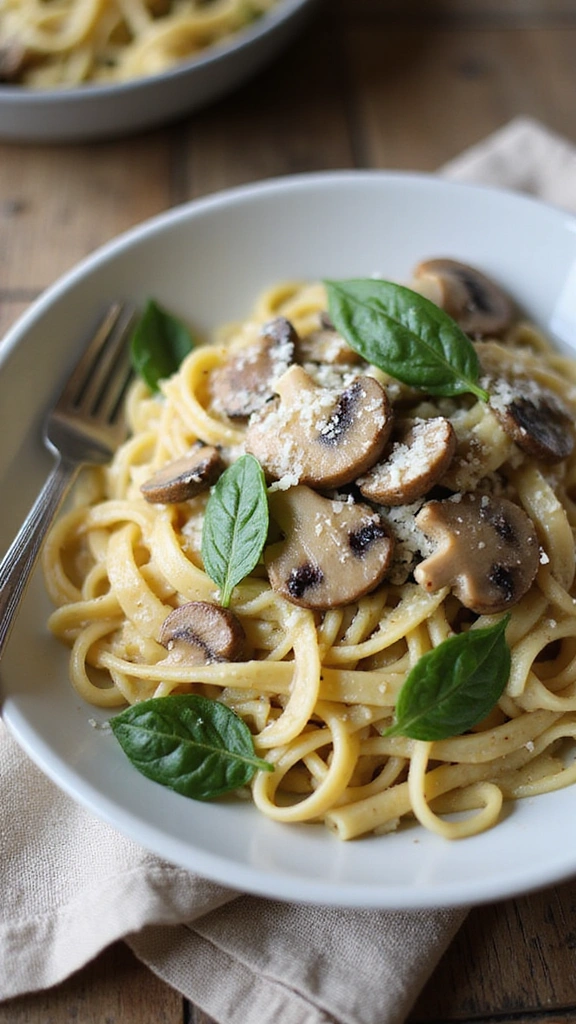
Who says creamy pasta can’t be healthy? This lighter version swaps heavy cream for protein-packed Greek yogurt, creating a silky sauce that clings to every noodle. With earthy mushrooms, fresh spinach, and a garlicky punch, it’s comfort food made virtuous—and ready before the kids start asking “Is dinner done yet?”
– Servings: 4
– Prep Time: 10 mins
– Cook Time: 15 mins
– Total Time: 25 mins
– Calories: 350/serving (All the cozy vibes, none of the guilt!)
Ingredients:
- 12 oz pasta (penne, fettuccine, or whatever’s in your pantry)
- 2 cups mushrooms, sliced (baby bellas for extra umami!)
- 1 cup spinach (sneaky greens = mum win)
- 1 cup Greek yogurt (creamy + protein boost)
- ½ cup vegetable broth (or chicken broth for deeper flavor)
- 2 cloves garlic, minced (non-negotiable for happiness)
- Parmesan cheese (because everything’s better with cheese snow)
Instructions:
- Pasta party: Cook noodles al dente, then drain with a pasta colander (no escaped noodles allowed!).
- Sizzle time: In a non-stick skillet, sauté garlic and mushrooms until golden (about 5 mins).
- Green power: Toss in spinach until wilted (30 seconds—easy!).
- Creamy magic: Stir in Greek yogurt and broth until silky. Pro tip: Take the skillet off heat first to prevent curdling!
- Toss & triumph: Combine sauce with pasta, top with Parmesan, and devour.
Chef’s flourish: Sprinkle with fresh parsley or red pepper flakes for a pop of color and zing!
FAQs:
- Veggie swaps? Try zucchini, asparagus, or peas—toss ’em in with the mushrooms!
- Leftovers? Store in an airtight container for up to 3 days (add a splash of broth when reheating).
- Why Greek yogurt? It’s got twice the protein of sour cream—stealthy nutrition!
Why Mums Are Obsessed:
✅ Sneaks in veggies (mushrooms + spinach = fiber fest)
✅ Kids gobble it up (creamy = universal kid language)
✅ Pantry-friendly (no fancy ingredients needed)
Kitchen MVPs:
- Pasta colander (for drip-free draining)
- Non-stick skillet (no stuck-on garlic disasters)
- Measuring cups/spoons set (perfect ratios every time)
4. 20-Minute Magic Veggie Stir-Fry (Clean-Out-The-Fridge Edition!) 🥢
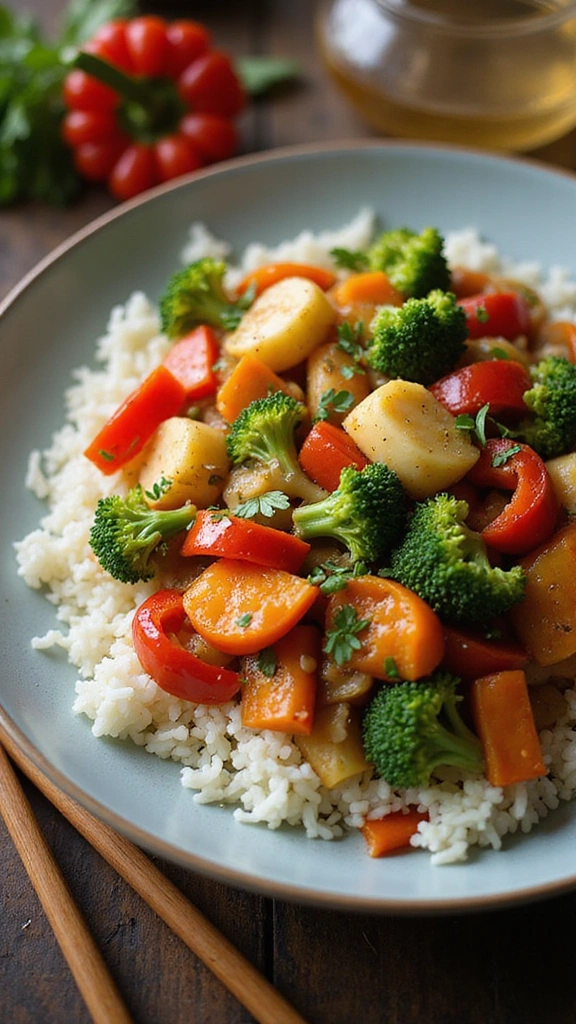
Got veggies? You’ve got dinner! This lightning-fast stir-fry is your ticket to a colorful, nutrient-packed meal—no fancy ingredients required. Customize with whatever’s lurking in your crisper, and pair with rice, noodles, or even eat it straight from the pan (we won’t judge). Bonus: That non-stick wok means zero scrubbing afterward!
– Servings: 4
– Prep Time: 5 mins
– Cook Time: 15 mins
– Total Time: 20 mins
– Calories: 250/serving (Low-cal, high-vibe!)
Ingredients:
- 2 cups chopped veggies (bell peppers, carrots, broccoli, snap peas—whatever’s wilting in your fridge!)
- 1 tbsp soy sauce (or tamari for gluten-free)
- 1 tbsp sesame oil (for that toasty aroma)
- 2 cloves garlic, minced (the flavor backbone)
- 1 tsp fresh ginger, grated (secret zing!)
- Rice or noodles (for serving)
Protein boost? Add tofu, chicken, or shrimp!
Instructions:
- Heat the oil in a non-stick wok or skillet over medium-high heat.
- Sizzle the aromatics: Cook garlic and ginger for 30 seconds until fragrant (don’t let them burn!).
- Veggie party: Toss in your chopped veggies and stir-fry for 5-7 mins until crisp-tender. (Pro tip: Hard veggies first, leafy greens last!)
- Sauce it up: Drizzle with soy sauce (use a soy sauce dispenser for mess-free precision!) and toss.
- Serve over rice/noodles or devour as-is!
Garnish game: Sprinkle with sesame seeds, green onions, or red pepper flakes for extra oomph!
FAQs:
- Frozen veggies? Yes! Just skip the thawing—add straight to the pan.
- Sauce swaps? Try teriyaki, hoisin, or a splash of oyster sauce.
- Veggie VIPs? Bell peppers = vitamin C, carrots = beta-carotene, broccoli = fiber for days.
Why Mums Cheer for This:
✅ Clears out the fridge (zero waste = winning)
✅ Kid-friendly (let them pick their fave veggies!)
✅ Faster than takeout (and way healthier)
Kitchen Sidekicks:
- Non-stick wok (for perfect stir-fry every time)
- Soy sauce dispenser (no more accidental floods)
- Veggie peeler (for quick carrot ribbons or zucchini noodles)
5. 30-Minute Fiesta Chicken Fajitas 🌶️ (One-Pan Wonder!)
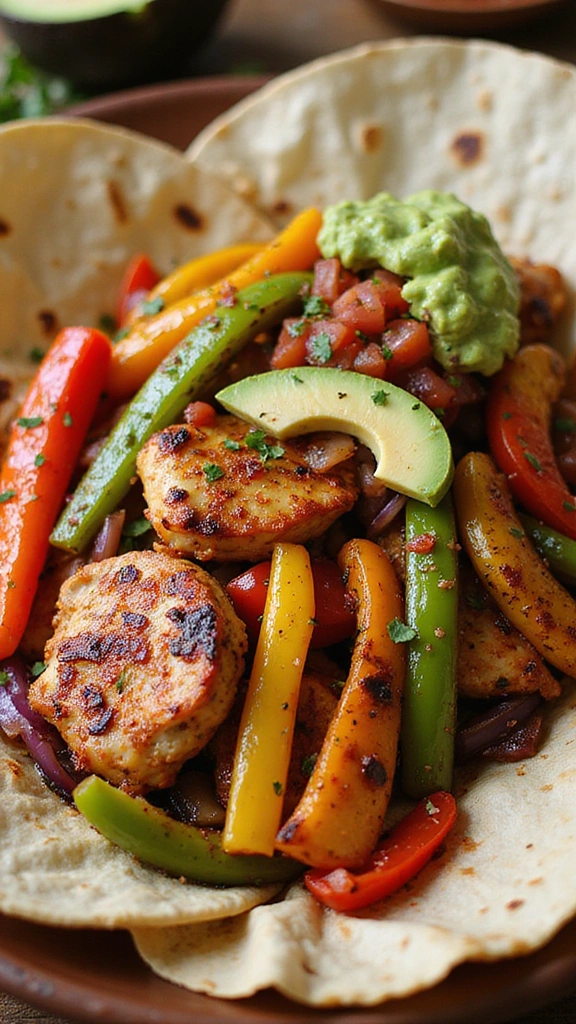
Dinner just got a flavor explosion! These sizzling chicken fajitas are bursting with colorful veggies, lean protein, and that irresistible smoky seasoning. Best part? Everything cooks in one pan—meaning more time to eat, less time to clean. (Pssst… that non-stick skillet? Your MVP for no-stick stress!)
– Servings: 4
– Prep Time: 15 mins
– Cook Time: 15 mins
– Total Time: 30 mins
– Calories: 320/serving (High-protein, low-carb friendly!)
Ingredients:
- 1 lb chicken breast, sliced thin (or swap with shrimp/steak!)
- 2 bell peppers, sliced (go rainbow for max vibrancy!)
- 1 onion, sliced (sweet or red—your call!)
- 2 tbsp fajita seasoning (store-bought or DIY blend below!)
- Tortillas (or lettuce wraps for low-carb)
- Toppings bar: Avocado, salsa, Greek yogurt (or sour cream), lime wedges
DIY Seasoning (if needed):
*1 tsp each cumin + smoked paprika + garlic powder + ½ tsp salt*
Instructions:
- Sizzle the chicken: Heat a non-stick skillet over medium-high, cook chicken for 5-6 mins until golden. Remove and set aside.
- Veggie fiesta: In the same pan, toss peppers and onions with fajita seasoning. Cook for 5 mins until slightly charred.
- Reunite! Add chicken back to the pan, stir to coat in spices.
- Serve it hot: Pile onto warmed tortillas (use a tortilla warmer to keep ’em soft!) or over greens. Top like a boss!
Pro Tip: Marinate chicken overnight in lime juice + seasoning for next-level flavor.
FAQs:
- No fajita seasoning? Mix cumin + paprika + garlic powder (equal parts)!
- Prepping ahead? Chop veggies and chicken the night before for super-speed cooking.
- Why chicken breast? Lean protein powerhouse—keeps kiddos full without the grease!
Why Mums Cheer for This:
✅ One-pan = easy cleanup (hallelujah!)
✅ Customizable (let everyone build their own!)
✅ Leftover magic (chicken + veggies = amazing next-day salads or quesadillas)
Kitchen Heroes:
- Non-stick skillet (for perfect searing)
- Fajita seasoning mix (or DIY spices)
- Tortilla warmer (no more stiff, cold wraps!)
6. Cozy Clean-Out-The-Fridge Veggie Soup (Instant Pot or Stovetop!) 🍲
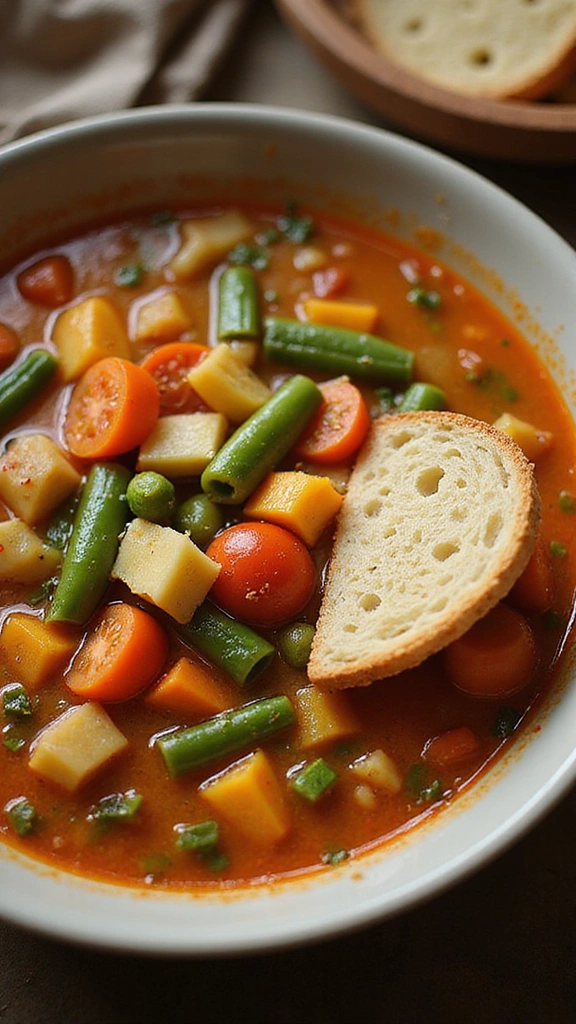
Chilly day? Soup’s on! This nutrient-packed veggie soup is the ultimate comfort food—loaded with whatever veggies you’ve got, simmered in savory broth, and ready in under 40 minutes. Bonus: It’s freezer-friendly and tastes even better the next day! (P.S. Your Instant Pot makes it stupid easy—sauté AND pressure cook in one pot!)
– Servings: 6
– Prep Time: 10 mins
– Cook Time: 30 mins
– Total Time: 40 mins
– Calories: 150/serving (Low-cal, high-comfort!)
Ingredients:
- 4 cups vegetable broth (or chicken broth for extra richness)
- 2 cups chopped veggies (carrots, celery, bell peppers, zucchini—whatever’s hiding in your fridge!)
- 1 can diced tomatoes (fire-roasted for smoky depth)
- 1 cup green beans, chopped (fresh or frozen)
- 1 tsp Italian seasoning (or herbes de Provence)
- Salt & pepper to taste
Hearty add-ins: Cooked pasta, rice, or white beans!
Instructions:
Instant Pot Method (FAST!):
- Sauté mode: Heat 1 tbsp olive oil in your Instant Pot, then toss in veggies for 3-4 mins.
- Pressure cook: Add broth, tomatoes, green beans, and seasoning. Seal lid, cook on High Pressure for 5 mins.
- Quick release, season, and serve! (So easy.)
Stovetop Method:
- In a large pot, bring broth to a boil.
- Add veggies, tomatoes, and seasoning. Simmer 25-30 mins until tender.
Pro Tip: Use a vegetable chopper to dice veggies in seconds!
FAQs:
- Freezeable? Yes! Store in airtight containers for up to 3 months.
- Broth swap? Chicken broth or even water + bouillon works.
- Want it creamy? Blend half the soup, then stir back in!
Why Mums Adore This:
✅ Clears out leftover veggies (zero waste win!)
✅ Instant Pot = hands-off cooking (set it and forget it!)
✅ Kid-friendly (sneak in extra veggies—they’ll never know!)
Kitchen Heroes:
- Instant Pot Duo (for lightning-fast soup)
- Silicone utensil set (no-scratch stirring + easy cleanup)
- Vegetable chopper (uniform chops in a flash)
7. One-Pan Lemon Garlic Chicken & Veggies (40-Minute Miracle Meal!) 🍋
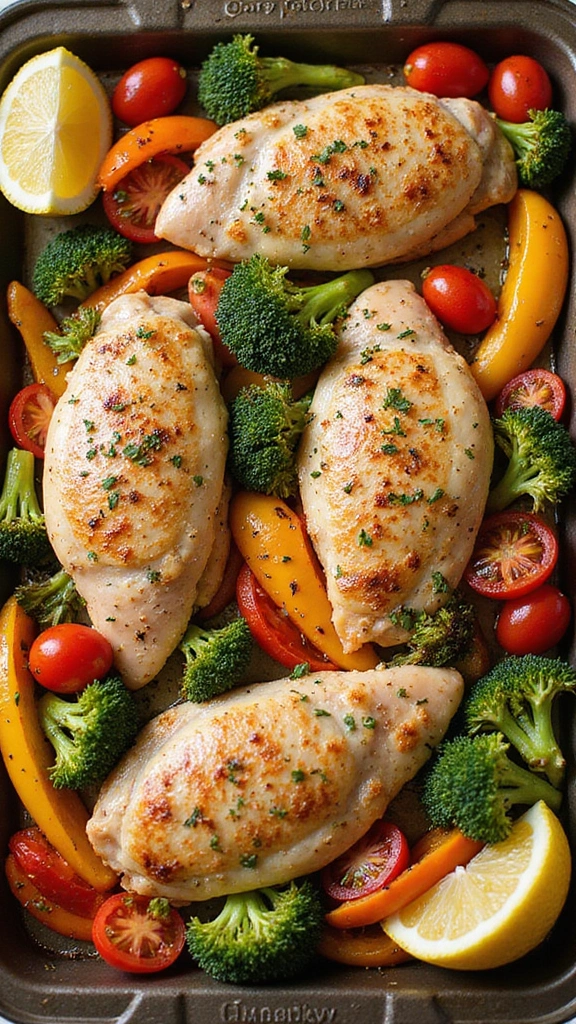
Dinner just got easier—and tastier! Juicy chicken, crispy-tender veggies, and a zesty lemon-garlic sauce all cook together on one pan for a flavor-packed meal with almost no cleanup. (That nonstick baking sheet? Your secret weapon for golden chicken without the stuck-on mess!)
– Servings: 4
– Prep Time: 10 mins
– Cook Time: 30 mins
– Total Time: 40 mins
– Calories: 350/serving (High-protein, low-carb perfection!)
Ingredients:
- 4 chicken breasts (or thighs for extra juiciness)
- 2 cups broccoli florets (or sub cauliflower)
- 1 bell pepper, sliced (any color!)
- 1 cup cherry tomatoes (for pops of sweetness)
- 4 garlic cloves, minced (a garlic press makes this lightning-fast!)
- Juice of 1 lemon (plus extra for serving)
- 2 tbsp olive oil (an oil dispenser ensures perfect drizzling)
- Salt & pepper to taste
- Red pepper flakes (optional, for heat lovers!)
Instructions:
- Heat it up: Preheat oven to 400°F (200°C).
- Marinate magic: In a bowl, toss chicken with garlic, lemon juice, olive oil, salt, and pepper. (No bowl? Just mix right on the pan!)
- Pan party: Arrange chicken on a baking sheet, scatter veggies around it.
- Roast: Bake for 25-30 mins until chicken hits 165°F and veggies are charred at the edges.
- Finish bright: Squeeze with extra lemon and sprinkle with red pepper flakes if you like it spicy!
Pro Tip: Line your pan with parchment paper for zero-scrub cleanup!
FAQs:
- Chicken swap? Thighs or tofu work great!
- Veggie variations? Try zucchini, asparagus, or sweet potatoes.
- Leftovers? Store in an airtight container for up to 3 days (reheats like a dream!).
Why Mums Cheer for This:
✅ One pan = minimal mess (more time for you!)
✅ Kid-approved (even veggie skeptics gobble it up)
✅ Meal prep hero (double the batch for easy lunches!)
Kitchen MVPs:
- Nonstick baking sheet (for flawless roasting)
- Garlic press (minces in seconds—no sticky fingers!)
- Olive oil dispenser (no more accidental glugs)
8. 30-Minute Perfect Salmon 🐟 & Veggies Sheet Pan Dinner
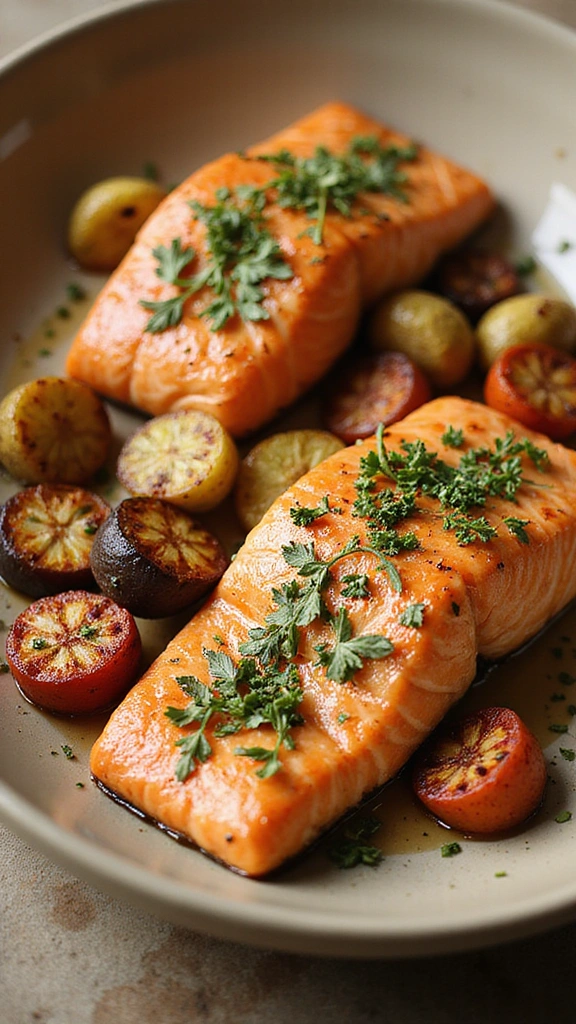
Healthy dinner doesn’t get easier than this! Flaky, omega-3 rich salmon and colorful roasted veggies cook together on one pan for a nutritious meal that’s ready in 30 minutes flat. (That silicone baking mat? Your secret for perfectly cooked salmon with zero sticking!)
– Servings: 4
– Prep Time: 10 mins
– Cook Time: 20 mins
– Total Time: 30 mins
– Calories: 350/serving (Packed with protein & healthy fats!)
Ingredients:
- 4 salmon fillets (skin-on for extra crispness!)
- 2 cups seasonal veggies (zucchini, asparagus, bell peppers, or swap with broccoli/Brussels sprouts)
- 2 tbsp olive oil (use a dispenser bottle for mess-free drizzling)
- Salt & pepper to taste
- Lemon wedges (essential bright flavor!)
- Fresh herbs like dill or parsley (optional but chef’s kiss)
Instructions:
- Heat it up: Preheat oven to 375°F (190°C). Line a baking sheet with a silicone mat (or parchment).
- Prep & season: Arrange salmon and veggies on the pan. Drizzle with olive oil, then sprinkle with salt and pepper. (Pro tip: Place veggies under salmon to catch delicious drippings!)
- Bake: Roast for 15-20 mins until salmon flakes easily and veggies are tender-crisp.
- Finish fresh: Squeeze lemon over everything and garnish with herbs.
Extra flavor: Add a sprinkle of garlic powder or paprika before baking!
FAQs:
- Frozen salmon? Thaw overnight in the fridge first.
- Veggie swaps? Green beans, cherry tomatoes, or sweet potatoes work too!
- Crispier skin? Sear salmon skin-side down in a pan for 2 mins before baking.
Why Mums Rave About This:
✅ One-pan = easy cleanup (more time for family!)
✅ Brain-boosting omega-3s (great for growing kids!)
✅ Endlessly adaptable (use whatever veggies you have!)
Kitchen Heroes:
- Oven-safe baking sheet (sturdy & warp-proof)
- Olive oil dispenser (no more accidental oil floods)
- Silicone baking mat (nonstick & eco-friendly)
9. 20-Minute Creamy Chickpea Curry 🍛
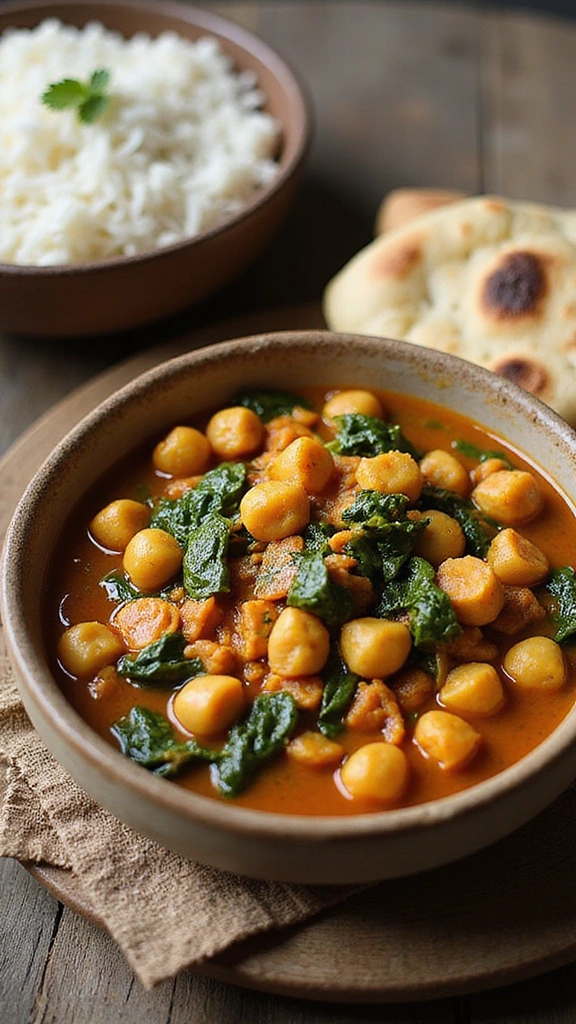
Craving cozy flavors fast? This protein-packed chickpea curry is ready in 20 minutes, simmered in creamy coconut milk and fragrant spices. Perfect over rice or with naan for dunking! (P.S. Your Instant Pot makes it even easier—just sauté and simmer in one pot!)
– Servings: 4
– Prep Time: 5 mins
– Cook Time: 15 mins
– Total Time: 20 mins
– Calories: 300/serving (Fiber-rich & plant-powered!)
Ingredients:
- 1 can chickpeas, drained/rinsed (or 1.5 cups cooked)
- 1 can coconut milk (full-fat for extra creaminess)
- 2 tbsp curry paste (red, yellow, or tikka masala)
- 2 cups spinach (or kale for extra greens)
- 1 tsp cumin (toasty warmth)
- Salt to taste
- Cooked rice/naan (for serving)
- Lime wedges (bright finish!)
No curry paste? Use 1 tsp each turmeric + coriander + garam masala!
Instructions:
Stovetop Method:
- Simmer: In a non-stick pot, combine chickpeas, coconut milk, curry paste, and cumin. Cook 10 mins on medium-low.
- Greens: Stir in spinach until wilted (1-2 mins). Season with salt.
- Serve: Over rice with lime squeezed on top!
Instant Pot Method (FASTER!):
- Sauté: Use Sauté mode to toast curry paste + cumin in the pot (1 min).
- Pressure cook: Add chickpeas + coconut milk. Seal lid, cook on High Pressure for 3 mins, then quick release.
- Finish: Stir in spinach until wilted.
Pro Tip: Use a bamboo utensil to gently stir—no scratching your pot!
FAQs:
- Freeze it? Yes! Store in airtight containers for 3 months.
- Spice level? Add cayenne or chili flakes for heat.
- Extra protein? Toss in tofu or cooked chicken!
Why Mums Love This:
✅ Pantry-friendly ingredients (no last-minute grocery runs!)
✅ Kid-approved (mild curry flavor + creamy texture)
✅ Meal prep hero (tastes even better the next day!)
Kitchen MVPs:
- Instant Pot Duo (for lightning-fast cooking)
- Non-stick pot (for stovetop version)
- Bamboo utensil set (gentle on cookware)
10. 25-Minute Tomato Basil Flatbread 🍅 (Italian-Inspired & Kid-Approved!)
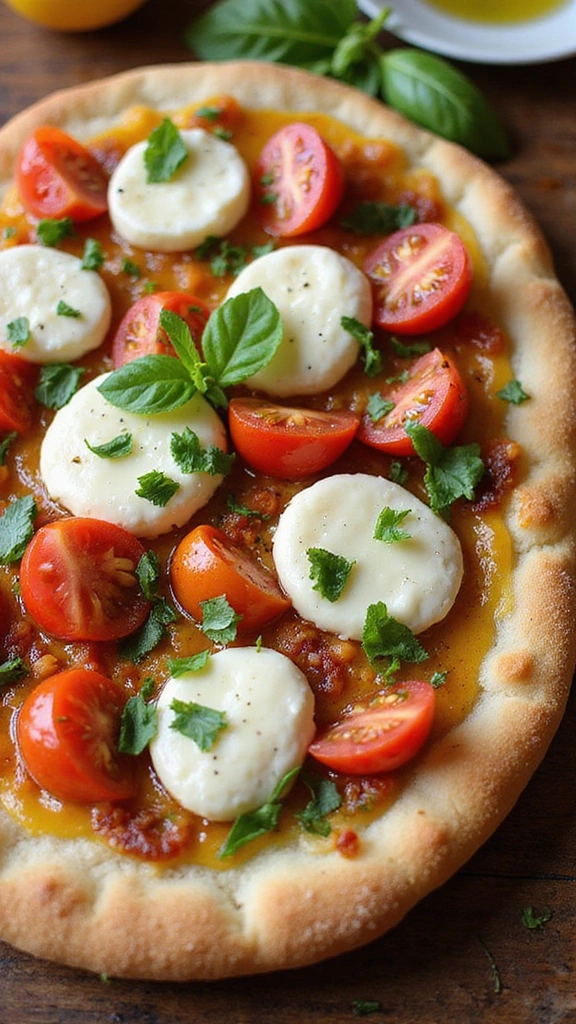
Pizza night, simplified! This fresh, flavorful flatbread combines juicy cherry tomatoes, melty mozzarella, and fragrant basil on a crispy crust—ready in just 25 minutes. Perfect for busy nights when you want something light but satisfying! (P.S. Using Joseph’s Lavash Bread keeps it wholesome and easy!)
– Servings: 4
– Prep Time: 10 mins
– Cook Time: 15 mins
– Total Time: 25 mins
– Calories: 250/serving (Low-cal, high-flavor!)
Ingredients:
- 2 flatbreads (Joseph’s Lavash Bread for a multigrain boost!)
- 2 cups cherry tomatoes, halved (bursting with sweetness!)
- 1 cup shredded mozzarella (365 Everyday Value Organic for quality melt!)
- ¼ cup fresh basil, chopped (don’t skip this—it’s the star!)
- 2 tbsp olive oil (Pompeian Smooth EVOO for rich flavor)
- Salt & pepper to taste
Gourmet twist? Add a drizzle of balsamic glaze or a handful of arugula after baking!
Instructions:
- Heat it up: Preheat oven to 400°F (200°C).
- Prep the base: Place flatbreads on a baking sheet, drizzle with olive oil.
- Top it off: Scatter tomatoes, mozzarella, salt, and pepper evenly.
- Bake: Cook for 10-15 mins until cheese is bubbly and golden.
- Finish fresh: Sprinkle with basil (the aroma is unreal!).
Serve with: A simple side salad for a complete meal!
FAQs:
- Vegan version? Swap mozzarella for vegan cheese (or skip cheese altogether!).
- Extra crunch? Bake flatbread for 3-5 mins before adding toppings.
- No cherry tomatoes? Use sliced Roma tomatoes or sun-dried tomatoes for a punchier flavor.
Why Mums Love This:
✅ Faster than delivery (and healthier!)
✅ Endlessly customizable (let kids pick their own toppings!)
✅ Works hot or cold (pack leftovers for lunch!)
Kitchen Heroes:
- Joseph’s Lavash Bread (thin, wholesome, and sturdy)
- 365 Organic Mozzarella (creamy melt every time)
- Pompeian EVOO (for that authentic Italian touch)
11. 15-Minute Zucchini Noodles with Pesto 🥒 (Low-Carb & Kid-Friendly!)
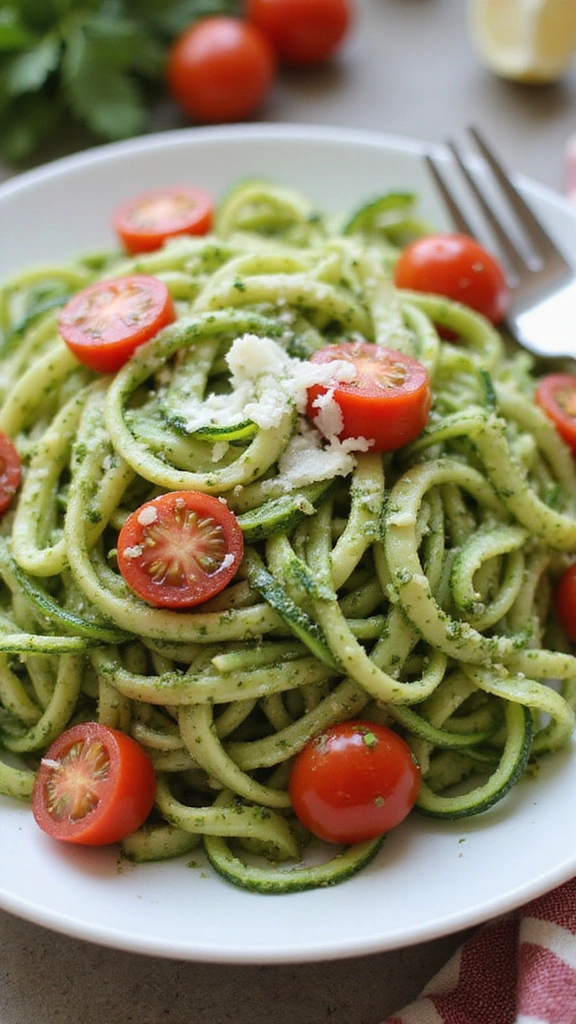
Pasta night, made healthier! These vibrant zucchini noodles are tossed with fragrant pesto and juicy cherry tomatoes for a light, veggie-packed meal that’s ready in 15 minutes. (*P.S. A spiralizer turns this into a 5-minute prep job!*)
– Servings: 4
– Prep Time: 10 mins
– Cook Time: 5 mins
– Total Time: 15 mins
– Calories: 200/serving (Low-carb, high-flavor!)
Ingredients:
- 4 medium zucchinis, spiralized (Veggetti slicer = perfect noodles in seconds!)
- ½ cup pesto (Seggiano Fresh Basil Pesto for gourmet taste!)
- 1 cup cherry tomatoes, halved (bursts of sweetness!)
- Salt & pepper to taste
- Parmesan cheese (optional, but highly recommended)
Protein boost? Add grilled chicken, shrimp, or chickpeas!
Instructions:
- Spiralize: Use a Veggetti slicer to turn zucchinis into noodles (or a peeler for ribbons).
- Sauté: In a SENSARTE nonstick skillet, cook zucchini noodles for 3-5 mins until just tender (no mush!).
- Toss: Remove from heat, mix with pesto and tomatoes. Season to taste.
- Serve: Top with Parmesan and dig in!
Pro Tip: For raw “zoodles,” skip cooking—just toss with pesto and let sit 5 mins to soften!
FAQs:
- Store-bought pesto? Yes! Seggiano or Barilla work great.
- No spiralizer? Use a julienne peeler or buy pre-spiralized zucchini.
- Make it vegan? Skip Parmesan or use nutritional yeast.
Why Mums Love This:
✅ Sneaks in veggies (picky eaters won’t complain!)
✅ Faster than boiling pasta (15 mins start to finish!)
✅ Meal-prep friendly (pack cold for lunches!)
Kitchen Heroes:
- Veggetti slicer (for foolproof noodles)
- SENSARTE nonstick skillet (no sticking, easy cleanup)
- Seggiano pesto (bright, herby, and delish)
Dinner Stress? Solved! 🎉
With these 20 family-friendly recipes, busy nights just got easier, healthier, and way more delicious. From 15-minute zoodles to freezer-friendly burritos, each dish is designed to save you time without skimping on flavor or nutrition.
Pro Tip: Mix and match them throughout the week to keep meals exciting—no more “ugh, not this again!” from the kiddos. And hey, why not turn cooking into family fun? Let the little ones toss veggies or sprinkle cheese. (Bonus: They’re more likely to eat what they help make! 👩🍳)
A Quick Note:
We carefully curate product links to make your life easier, but occasionally they may expire. If so, a quick Amazon search for the item name will do the trick! As an Amazon Associate, I earn from qualifying purchases—thanks for supporting our work!
Now go conquer that kitchen—and those busy nights! ❤️


